# Nginx从入门到放弃06-Nginx的N种特别实用示例
从前面的几篇教程里面我们知道了nginx的安装和调优、负载均衡、反向代理等,这篇文档我们来介绍Nginx的N种特别实用示例
笔者把自己总结的文档分为几遍,合集在 https://g.xgss.net/nginx/

# 一、location
location块负责匹配url,root指令负责将匹配到的url与服务器中某个具体目录对应起来。
语法规则:
location [=|~|~*|^~] /uri/ { … }
location优先级
(location =) > (location 完整路径 ) >(location ^~ 路径) >(location ~*, ~ 正则) >(location 部分起始路径) 正则表达式根据配置文件中的前后顺序影响匹配, 前面的优先匹配. 其它则根据匹配长度来优先匹配.
# 精确匹配(=开头)
location = / {
   #规则A
}
location = /login {
   #规则B
}
2
3
4
5
6
# ^~ 开头某个常规字符串
表示uri以某个常规字符串开头,理解为匹配url路径即可。nginx不对url做编码,因此请求为/static/20%/aa,可以被规则^~ /static/ /aa匹配到(注意是空格)。
location ^~ /static/ {
   #规则C
}
2
3
# 区分大小写(~ 开头)
表示区分大小写的正则匹配
location ~ \.(gif|jpg|png|js|css)$ {
   #规则D
}
2
3
# 不区分大小写(~*开头)
表示不区分大小写的正则匹配
location ~* \.png$ {
   #规则E
}
2
3
# !~和!~*表示
分别为区分大小写不匹配及不区分大小写不匹配 的正则
location !~ \.xhtml$ {
   #规则F
}
location !~* \.xhtml$ {
   #规则G
}
2
3
4
5
6
# 通用匹配(/ 开头)
任何请求都会匹配到。
location / {
   #规则H
}
2
3
# 二、Nginx实用实例
# 1.设置缓存时间
控制图片、HTML等静态文件过期时间为30天,当然这个时间可以设置的更长。具体视情况而定
location ~ .*\.(htm|html|css|js|jpg|jpeg|gif|png|ico|bmp|gz|xml|zip|rar|swf|txt|xls|xlsx|flv|mid|doc|ppt|pdf|mp3|wma|exe)?$ {
                root /data/pic/;
                expires     30d;
                access_log /dev/null;
}
2
3
4
5
expires设置缓存时间
expires [time|epoch|max|off]
expires epoch 指定“Expires”的值为 1 January, 1970, 00:00:01 GMT。
expires max 指定“Expires”的值为 31 December 2037 23:59:59 GMT,“Cache-Control”的值为10年。
expires -1 指定“Expires”的值为 服务器当前时间 -1s,即永远过期
2
3
4
# 2.HTTP跳转到HTTPS
如下http80端口项目301跳转到https
server {
  listen       80;
  server_name  www.test.com;
  return 301   https://$host$request_uri;
}

if ($host = 'test.com') {
        rewrite ^/(.*)$ https://www.test.com/$1 permanent;
}
2
3
4
5
6
7
8
9
https配置,需要获取域名证书。
server {
        listen       443;
        server_name  www.test.com;
        root /data/wwwroot/www.test.com/;
        access_log /data/wwwroot/log/ssl_www.test.com-access.log;
        error_log /dev/null;

		ssl on;
		ssl_certificate /data/wwwroot/cert/www.test.com.pem;
		ssl_certificate_key /data/wwwroot/cert/www.test.com.key;
		ssl_session_timeout 5m;
		ssl_ciphers ECDHE-RSA-AES128-GCM-SHA256:ECDHE:ECDH:AES:HIGH:!NULL:!aNULL:!MD5:!ADH:!RC4;
		ssl_protocols TLSv1 TLSv1.1 TLSv1.2;
		ssl_prefer_server_ciphers on;

        location / {
                index  index.html index.htm index.php;
        }
}
2
3
4
5
6
7
8
9
10
11
12
13
14
15
16
17
18
19
# 3.设置404页面
error_page 404 = http://www.baidu.com/hot/jmb/?from=404_hlx&404_url=$scheme://$host$request_uri&404_from=$http_referer;
解释:
http://www.nginx01.com/1111?from=testpage
如果是404则会跳转到:
https://www.baidu.com/hot/jmb/?from=404_hlx&404_url=http://www.nginx01.com/1111?from=testpage&404_from=
2
3
# 4.配置PHP不缓存
location ~ .*/.(php|php5)?$ {
	add_header Cache-Control no-cache;
}
2
3
# 5.禁止特定用户代理(User Agents)访问
禁止某些工具,或者搜索引擎蜘蛛爬取
if ($http_user_agent ~* (wget|curl|Firefox) ) {
	return 404;
}

禁止神马搜索
if ($http_user_agent ~* "YisouSpider") {
	return 403;
}
禁止useragent为空
if ($http_user_agent ~ ^$){
	return 403;
}
2
3
4
5
6
7
8
9
10
11
12
# 6.忽略favicon.ico文件的错误日志
location = /favicon.ico {
    log_not_found off;
    access_log /dev/null;
}
2
3
4
# 7.禁止某些目录php解析
location ~ .*(diy|template|attachments|forumdata|attachment|image)/.*\.php$ {
        deny all;
}
2
3
# 8.日志不记录HEAD方法
#日志不记录HEAD方法
if ($request_method = HEAD) {
    access_log off;
}
2
3
4
# 9.nginx密码认证
HTTP Basic Authentication协议验证的页面
新建密码文件:
# yum -y install httpd-tools
# printf "admin:$(openssl passwd -crypt 123456)\n" >>/data/conf/sites-available/htpasswd
# cat /data/conf/sites-available/htpasswd
admin:X2dW2ryA9hA7M
2
3
4
配置密码:
location /php {
                #密码认证
                auth_basic "nginx basic auth";
                auth_basic_user_file /data/conf/sites-available/htpasswd;
                autoindex on;
    }
2
3
4
5
6
浏览器访问:
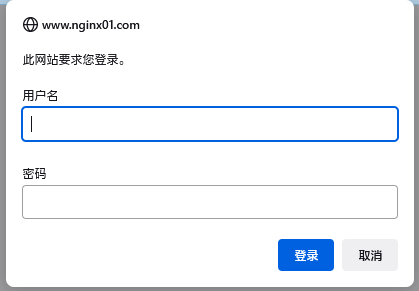
输入 admin 和123456即可进入。
对于这种有HTTP Basic Authentication协议验证的页面,如果使用curl抓取的话,可以加上账号密码进行请求:
curl请求:
# curl -u username:password URL
例如:  curl -u admin:123456 http://www.nginx01.com/php
如果用wget下载,可以用:
# wget --http-user= --http-passwd=passwd URL
2
3
4
5
# 10.nginx屏蔽ip方法
deny 219.133.188.183;
deny 10.0.1.0/24;
#屏蔽单个IP的命令是
deny 123.45.6.7
#封整个段即从123.0.0.1到123.255.255.254的命令
deny 123.0.0.0/8
#封IP段即从123.45.0.1到123.45.255.254的命令
deny 124.45.0.0/16
#封IP段即从 123.45.6.1到123.45.6.254的命令是
deny 123.45.6.0/24
allow 1.1.1.1;
allow 1.1.1.2;
deny all;
location / {
    allow 1.1.1.2;
    deny all;
}
2
3
4
5
6
7
8
9
10
11
12
13
14
15
16
17
# 11.阿里云SLB场景使用NGINX封用户真实IP
set $allow true;
if ($http_x_forwarded_for ~ "106.121.*.*|106.121.71.120|106.121.77.28|106.121.74.130|218.109.235.254"){
	set $allow false;
}
if ($allow = false){
	return 404;
}
2
3
4
5
6
7
# 12.禁止代理IP访问(http_x_forwarded_for)
if ($http_x_forwarded_for ~ (^192\.168\.1\.2$)){
         return 403;
}
2
3
# 13.禁止IP段:192.168.3.142~192.168.3.147
if ($http_x_forwarded_for ~ (^192\.168\.3\.14[2-7]$)){
                return 403;
}

if ($http_x_forwarded_for ~ (^183\.61\.51\.[51-70])){
                return 403;
}
2
3
4
5
6
7
# 14.禁止IP段: 192.168.64.0~192.168.95.255
if ($http_x_forwarded_for ~ (^192\.168\.[7-8][0-9]\.\d+$|^192\.168\.[6][4-9]\.\d+$|^192\.168\.[9][0-5]\.\d+$)){
                return 403;
}
2
3
# 15.禁止多个ip
if ($http_x_forwarded_for ~ "223.128.4.250|91.200.12.93") {
     return 403;
  }
2
3
# 16.禁止IP段:192.168.3.0~254
if ($http_x_forwarded_for ~ (^192\.168\.3\.[0-254]$)){
	return 403;
}
2
3
# 17.nginx允许跨域
当出现403跨域错误的时候 No 'Access-Control-Allow-Origin' header is present on the requested resource,需要给Nginx服务器配置响应的header参数:
  add_header Access-Control-Allow-Origin *;
  add_header Access-Control-Allow-Headers X-Requested-With;
  add_header Access-Control-Allow-Methods GET,POST,OPTIONS;
2
3
服务器默认是不被允许跨域的。给Nginx服务器配置Access-Control-Allow-Origin *后,表示服务器可以接受所有的请求源(Origin),即接受所有跨域的请求。
Access-Control-Allow-Headers 是为了防止出现以下错误: Request header field Content-Type is not allowed by Access-Control-Allow-Headers in preflight response.
这个错误表示当前请求Content-Type的值不被支持。其实是我们发起了"application/json"的类型请求导致的。这里涉及到一个概念:预检请求(preflight request),请看下面"预检请求"的介绍。
Access-Control-Allow-Methods 是为了防止出现以下错误: Content-Type is not allowed by Access-Control-Allow-Headers in preflight response.
给OPTIONS 添加 204的返回,是为了处理在发送POST请求时Nginx依然拒绝访问的错误 发送"预检请求"时,需要用到方法 OPTIONS ,所以服务器需要允许该方法。
location / {
    add_header Access-Control-Allow-Origin *;
    add_header Access-Control-Allow-Methods 'GET, POST, OPTIONS';
    add_header Access-Control-Allow-Headers 'DNT,X-Mx-ReqToken,Keep-Alive,User-Agent,X-Requested-With,If-Modified-Since,Cache-Control,Content-Type,Authorization';

    if ($request_method = 'OPTIONS') {
        return 204;
    }
}
2
3
4
5
6
7
8
9
# 18.nginx日志记录post参数
其实我们只需要把 $request_body 参数加入自定义日志记录信息中即可。
log_format main_aliyun_post '$request_time - RealIP:$clientRealIp - [$time_local] $request - $status - $http_user_agent - $host - from:$http_referer - Request_Body:$request_body';
# 19.根据域名设置root
需求:多个域名使用相同的配置,需要指定到不同root目录
www.a.com
www.b.com

root /data/wwwroot/web/$host/;
2
3
4
解释:/data/wwwroot/web/www.a.com/ 和 /data/wwwroot/web/www.a.com/
set $host_pwd "www.a.com";
if ( $host = 'www.b.com' ) {
	set $host_pwd "www.b.com";
}
if ( $host = 'www.c.com' ) {
	set $host_pwd "www.c.com";
}
root /data/wwwroot/web/$host_pwd/;
2
3
4
5
6
7
8
# 20.判断二级域名
判断二级域名指定到不同的root目录
if ( $host ~* (\b(?!www\b)\w+)\.\w+\.\w+ ) {
	set $subdomain $1;
}
root /data/wwwroot/html/$subdomain/;
2
3
4
server {
        listen       80 default;
        server_name _;
        access_log /data/wwwroot/log/ios-check-access.log main_aliyun;
        error_log /dev/null;

        location / {
                root /data/wwwroot/html/$host/;
                index index.html;
                expires max;
        }
     }
systemctl reload nginx
2
3
4
5
6
7
8
9
10
11
12
13
# 21.nginx配置X-Forwarded-For 防止伪造ip
网上常见nginx配置ip请求头
proxy_set_header X-Forwarded-For $proxy_add_x_forwarded_for;
风险: 用户可以通过自己设置请求头来伪造ip,比如用户在发起http请求是自己测试请求头 x-forwarded-for:192.168.0.151。那么服务器通过x-forwarded-for获取到的第一个ip就是用户伪造的ip。
防止伪造方案:
情况1: 在只有1层nginx代理的情况下,设置nginx配置“proxy_set_header X-Forwarded-For $remote_addr;”。(此时$remote_addr获取的是用户的真是ip)
情况2:在有多层反向代理的情况下,
1)设置“最外层”nginx配置和情况1一样“proxy_set_header X-Forwarded-For $remote_addr;”。
2)除了“最外层”之外的nginx配置“proxy_set_header X-Forwarded-For $proxy_add_x_forwarded_for;”。
  这样就防止了用户通过伪造请求头来伪造真实ip。后台只需要从x-forwarded-for请求头中取出第一个ip就是用户的真实ip。后面如果有多个ip,就是反向代理的ip
2
3
4
5
其他基础配置:
location ^~ /apk/ {
                access_log /data/wwwroot/log/www.test.com-access.log;
                alias /data/wwwroot/web/apk/;
                expires max;
        }

location ~ /(resource|mediatorModule)/ {
                root    /opt/demo;
                expires max; 或者
    		   expires off;
}
2
3
4
5
6
7
8
9
10
11
# 三、nginx if 判断多条件
if指令该指令用来支持条件判断,并根据条件判断结果选择不同的Nginx配置。
| 语法 | if (condition){...} |
|---|---|
| 默认值 | — |
| 位置 | server、location |
# 1.变量名
如果变量名对应的值为空字符串或"0",if都判断为false,其他条件为true。
if ($param){

}
2
3
# 2.使用"="和"!="比较变量
使用"="和"!="比较变量和字符串是否相等,满足条件为true,不满足为false
如果请求的方法等于POST则返回 405。
if ($request_method = POST){
	return 405;
}
2
3
4
# 3.使用正则表达式对变量进行匹配,
匹配成功返回true,否则返回false。变量与正则表达式之间使用"~","~","!~","!~"来连接。
"~"代表匹配正则表达式过程中区分大小写,"~*"代表匹配正则表达式过程中不区分大小写
"!~"和"!~*"刚好和上面取相反值,如果匹配上返回false,匹配不上返回true
如果http_user_agent中包含MSIE则返回404
if ($http_user_agent ~ MSIE){
	#$http_user_agent的值中是否包含MSIE字符串,如果包含返回true
	return 404;
}
2
3
4
5
注意:正则表达式字符串一般不需要加引号,但是如果字符串中包含"}"或者是";"等字符时,就需要把引号加上。
# 4. 判断请求的文件是否存在使用"-f"和"!-f"
if (-f $request_filename){
	#判断请求的文件是否存在
}
if (!-f $request_filename){
	#判断请求的文件是否不存在
}
2
3
4
5
6
判断请求的目录是否存在使用"-d"和"!-d"
判断请求的目录或者文件是否存在使用"-e"和"!-e"
判断请求的文件是否可执行使用"-x"和"!-x"
获取地址中的某个参数
if ($query_string ~ ".*(?:^|\?|&)key=(.+?)(?:(?:&.*)|$)") {
       set $key "$1";
 }
if ( $uid != $key ){
       return 301 "https://smartgate.baoan.gov.cn/kshfwpt/H5app/index.html?key=${uid}";
}
地址比如是:
https://smartgate.baoan.gov.cn/kshfwpt/H5app/index.html?key=123&method=256
则$key的值为123
2
3
4
5
6
7
8
9
# nginx if配合set做判断
在nginx配置文件中,可以使用if语句,但是对于else语句其实是不支持的,并且and条件和or条件也是不支持的
判断http_x_forwarded_for是否为空,如果为空则正常,如果不为空,则wordpress后台跳转。
set $my_var '2';

if ( $http_x_forwarded_for ~ ^$){
    set $my_var 1;
}
if ( $my_var = 1) {
   #如果http_x_forwarded_for为空
   #rewrite ^/(.*)$ http://127.0.0.1/?11ab21s redirect;
}
if ( $my_var = 2) {
    rewrite ^/wp-login.php(.*) http://127.0.0.1/?s1 redirect;
}
2
3
4
5
6
7
8
9
10
11
12
# nginx设置跳转rewrite
$1 $2 $3分别代表前面第一/二/三个()里的内容
http://www.nginx01.com/gm001 会跳转到  https://www.baidu.com/game?appid=001

server {
  listen       80;
  server_name  www.nginx01.com;

  rewrite ^/gm(.*)  https://www.baidu.com/game?appid=$1 redirect;
}


其他:
rewrite ^/game-tg/rxzg-g(.*)$ http://tg.test.com/game-tg/txhc-g$1 redirect;
rewrite ^/game-tg/yg/gtjt-g(.*)/(.*)$ http://tg.test.com/game-tg/dhd-g6/$2 redirect;
2
3
4
5
6
7
8
9
10
11
12
13
# 匹配链接参数跳转
if ( $query_string ~* ^from=dxw_a4$ ){
        rewrite ^/cps/game/gid/66  http://www.test.com/html/game-tg/gcld-g13/;
}

http://www.nginx01.com/cps/game/gid/66?from=dxw_a4
会跳转到:
http://www.test.com/html/game-tg/gcld-g13/?from=dxw_a4
2
3
4
5
6
7
# 屏蔽参数带gid=90的链接
if ( $query_string ~* (.*)gid=90(.*) ){
	return 403;
}
2
3
aaa.com/*.html的链接全部重定向到aaa.com/aaa/index.html;
rewrite "^/(.*)\.html$" /aaa/$1.html break;
/123456/xxxx 跳转 /xxxx?id=123456
rewrite ^/(/d+)/(.+)/ /$2?id=$1 last;
# rewrite指令(break,last,redirect,permanent)
不写last和break - 那么流程就是依次执行这些rewrite
# 1.rewrite break
url重写后,直接使用当前资源,不再执行location里余下的语句,完成本次请求,地址栏url不变
break 终止匹配, 不再匹配后面的规则
if (!-e $request_filename) {
	rewrite ^(.*)$ /index.php?s=$1 last;
	break;
}
2
3
4
# 2.rewrite last
url重写后,马上发起一个新的请求,再次进入server块,重试location匹配,超过10次匹配不到报500错误,地址栏url不变
last 相当于Apache里的[L]标记,表示完成rewrite
rewrite "/category/(.*).html$" /category/?cd=$1 last;
# 3.rewrite redirect
返回302临时重定向,地址栏显示重定向后的url,爬虫不会更新url(因为是临时)
# 4.rewrite permanent
返回301永久重定向, 地址栏显示重定向后的url,爬虫更新url
# 四、location中使用root和alias
区别
# 1.alias指令只能在location块中使用,而root指令则不然
# 2.root指令会将location块的”url路径”带入到”root指令路径”中,将带入后的路径作为”最终路径”,使用”最终路径”与url建立对应关系,alias指令则直接将location块的”url路径”与”alias指令路径”建立对应关系。
# root示例1
location /demo {
    root /opt/test;
}
2
3
location块匹配的url为”/demo”,root指令的路径为”/opt/test”,那么,根据上述配置,当我们访问”/demo”这个url时,实际上访问的到底是服务器中的哪个路径呢?答案是”/opt/test/demo”路径
实验一下
mkdir -p /opt/test/demo
echo 'test' > /opt/test/index.html
echo 'demo' >/opt/test/demo/index.html
2
3
访问

访问 /demo/ 实际是在访问 ‘/opt/test/demo/’。
# alias示例2
location /demo1 {
    alias /opt/test;
}
2
3
访问
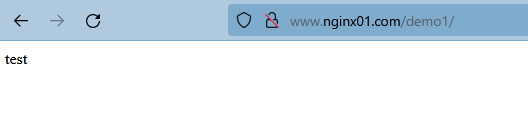
访问 /demo1/ 实际是在访问 ‘/opt/test/’。 location的url是与alias的路径完全对等的。