# Nginx从入门到放弃01-nginx基础安装篇
# 什么是Nginx
nginx(发音同engine x)是一款由俄罗斯程序员Igor Sysoev所开发轻量级的网页服务器、反向代理服务器以及电子邮件(IMAP/POP3)代理服务器。Nginx是一个轻量级/高性能的反向代理Web服务器,用于 HTTP、HTTPS、SMTP、POP3 和 IMAP 协议。他实现非常高效的反向代理、负载平衡,他可以处理2-3万并发连接数,官方监测能支持5万并发。
笔者把自己总结的文档分为几遍,合集在 https://g.xgss.net/nginx/
# Nginx优点
跨平台、配置简单。 非阻塞、高并发连接:处理 2-3 万并发连接数,官方监测能支持 5 万并发。 内存消耗小:开启 10 个 Nginx 才占 150M 内存。 成本低廉,且开源。 稳定性高,宕机的概率非常小。 内置的健康检查功能:如果有一个服务器宕机,会做一个健康检查,再发送的请求就不会发送到宕机的服务器了。

# Nginx和Apache对比
静态文件处理能力:nginx高于apache
资源消耗:nginx优于apache,因为nginx是异步处理模型,只需要几个进程就能够处理大量在线请求,而apache 2.4仍然是进程模型或者线程模型,即仍然采用大量线程来处理大量在线请求。
Apache支持的模块很多,而且也比较稳定。而nginx由于出现的比较晚,所以在这方面可能比不上Apache。
nginx本身就是一个反向代理服务器,而且支持7层负载均衡。
nginx处理动态页面很鸡肋,一般只用与处理静态页面和反向代理。
# Nginx应用场景?
# 1.HTTP服务器(web服务器)
可以使用Nginx来做服务器,如果一个网站只是静态页面的话,那么就可以通过这种方式来实现部署。
# 2.静态服务器
可以实现在一台服务器虚拟出多个网站,例如个人网站使用的虚拟机。
# 3.反向代理or正向代理
打个不恰当的比喻:
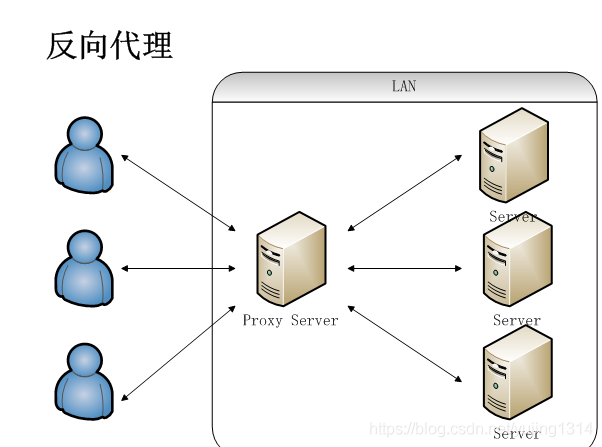
反向代理就如同你去某个大楼的前台需要找某人,前台帮你找到这个人,这个人来负责处理事务,而这个前台就相当于你的反向代理。
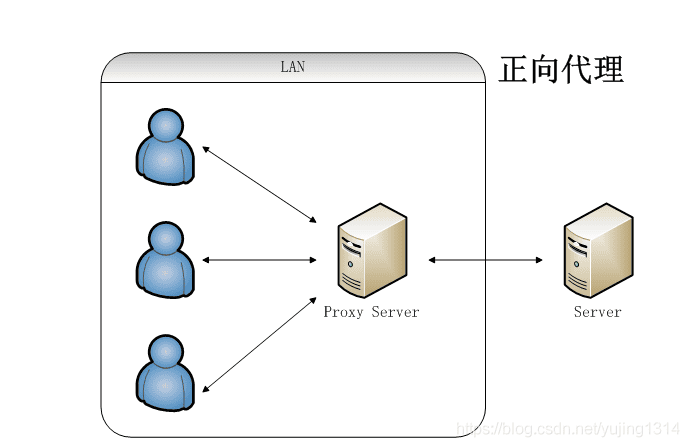
正向代理如同你是某个公司的CEO,让你的助理去找某人,这个助理就是你的‘正向代理’,应用最广泛的就是代理上网。
**反向代理:**客户端无法感知代理,因为客户端访问网络不需要配置,只要把请求发送到反向代理服务器,由反向代理服务器去选择目标服务器获取数据,然后再返回到客户端。

此时反向代理服务器和目标服务器对外就是一个服务器,暴露的是代理服务器地址,隐藏了真实服务器 IP 地址。
**正向代理:**局域网中的电脑用户想要直接访问网络是不可行的,只能通过代理服务器来访问,这种代理服务就被称为正向代理。

# 4.负载均衡
负载均衡也是Nginx常用的一个功能,负载均衡其意思就是分摊到多个操作单元上进行执行,例如Web服务器、FTP服务器、企业关键应用服务器和其它关键任务服务器等,从而共同完成工作任务。
普通请求和响应过程如下图:

但是随着信息数量增长,访问量和数据量飞速增长,普通架构无法满足现在的需求。
我们首先想到的是升级服务器配置,可以由于摩尔定律的日益失效,单纯从硬件提升性能已经逐渐不可取了,怎么解决这种需求呢?
我们可以增加服务器的数量,构建集群,将请求分发到各个服务器上,将原来请求集中到单个服务器的情况改为请求分发到多个服务器,也就是我们说的负载均衡。

# 5.动静分离
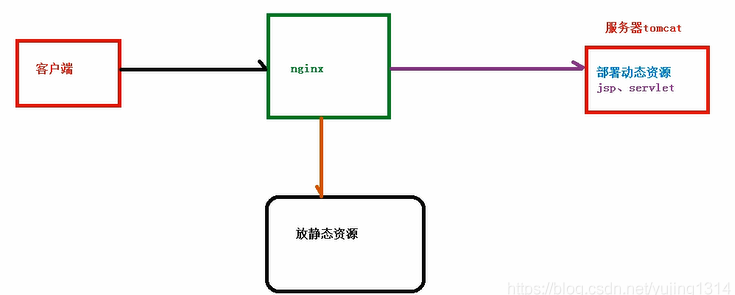
动静分离是让动态网站里的动态网页根据一定规则把不变的资源和经常变的资源区分开来,动静资源做好了拆分以后,我们就可以根据静态资源的特点将其做缓存操作,这就是网站静态化处理的核心思路。
动静分离之前的状态:

动静分离之后:

# Nginx版本
在官方版本中有开源免费版的nginx和商业版的nginx plus。
开源版官网:nginx.org
商业版官网:nginx.com
除了官方的nginx发行版,还有一些其他的、比较有名的nginx发行版,比如阿里巴巴的”Tengine”,或者”OpenResty”,如果对openresty有兴趣可以参考Centos7安装openresty实现WAF防火墙功能 (opens new window)
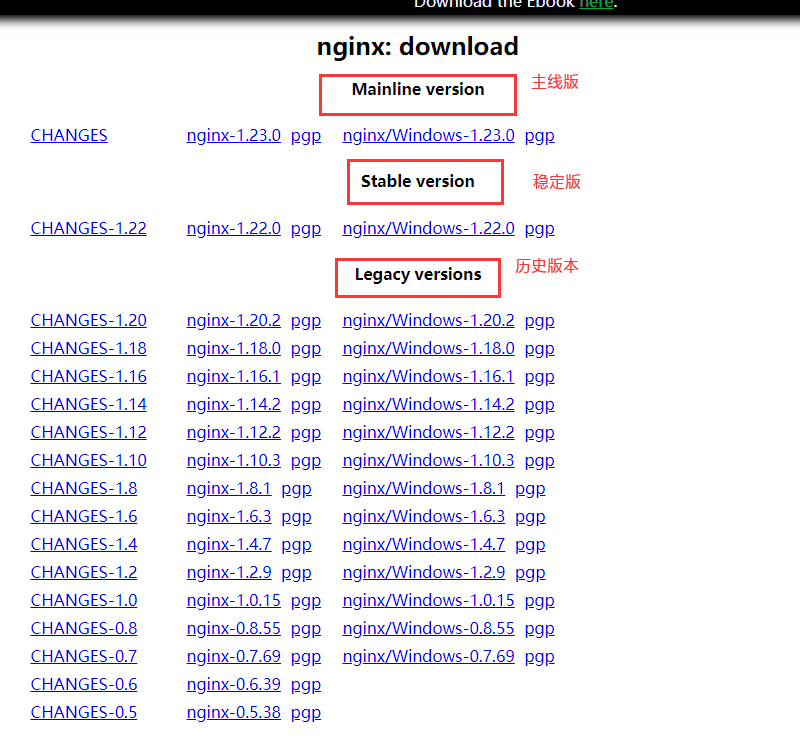
免费开源版的nginx上,开源版在细分之下,还有三个小类:”主线版本”、”稳定版本”、”历史版本”。
nginx版本下载页面:http://nginx.org/en/download.html

那么这三类版本有什么不同呢?通常来说,三类版本的含义如下:
# 主线版本
“Mainline version”,也有人称之为主干版或者开发版,主线版本通常是最新的版本,主线版通常会加入一些最新的功能,这些功能可能没有经过太多的测试,所以相对可能不太稳定,在真正的生产环境中,通常不会使用主线版本。
# 稳定版本
“Stable version”,稳定版通常是由主线版发展而来的,稳定版通常是经过官方测试的,是官方认为相对稳定的版本,生产环境中通常会使用稳定版。
# 历史版本
“Legacy version”,当新的稳定版出现,那么原先的稳定版就会被归类到”历史版本”中去。
# Cenots7安装Nginx
现在以Centos7系统安装nginx的两种方式
# 一、YUM安装Nginx
# 1、添加CentOS 7 Nginx yum资源库
# rpm -Uvh http://nginx.org/packages/centos/7/noarch/RPMS/nginx-release-centos-7-0.el7.ngx.noarch.rpm
当然也可以创建nginx官方yum源文件,此处创建的源文件为/etc/yum.repos.d/nginx.repo
# vim /etc/yum.repos.d/nginx.repo
添加:
[nginx]
name=nginx repo
baseurl=http://nginx.org/packages/centos/$releasever/$basearch/
gpgcheck=0
enabled=1
2
3
4
5
6
7
# 2、安装nginx
# yum -y install nginx
# 3、启动nginx
# systemctl start nginx
# 4、开机自启动(非必须)
可能的操作,nginx跟随系统自启动:
# systemctl enable nginx.service
# 5、防火墙设置(非必须)
开启防火墙端口或者关闭防火墙,开放80和443端口
Iptable:
# iptables -I INPUT -p tcp --dport 80 -j ACCEPT
# iptables -I INPUT -p tcp --dport 443 -j ACCEPT
# service iptables save
# systemctl restart iptables
或者直接关闭iptables
# systemctl stop iptables
2
3
4
5
6
firewall-cmd:
# firewall-cmd --zone=public --add-port=80/tcp --permanent
# firewall-cmd --zone=public --add-port=443/tcp --permanent
# firewall-cmd --reload
2
3
# 6、安装完成,可以在浏览器访问IP

完成上述配置即可成功安装nginx,很简单吧。
# 卸载nginx
# yum remove nginx
# 二、源码包安装Nginx
现在来看看怎样源码包编译安装nginx
# 1.安装编译器
yum install -y gc gcc gcc-c++
安装依耐包
# yum install -y pcre-devel zlib-devel openssl-devel libxslt-devel GeoIP-devel perl-ExtUtils-Embed
# 2.从官网下载nginx
http://nginx.org/en/download.html
我下载稳定版nginx-1.22.0,并将下载后的包解压
# mkdir -p /data/nginx   # nginx安装到此目录
# mkdir -p /data/software/

cd /data/software/
# wget http://nginx.org/download/nginx-1.22.0.tar.gz
# tar -zxvf nginx-1.22.0.tar.gz
2
3
4
5
6
进入解压目录,查看其内部的文件结构,如下
# cd nginx-1.22.0
# ll
total 800
drwxr-xr-x 6 vsftpd vsftpd    326 Jun 23 11:05 auto
-rw-r--r-- 1 vsftpd vsftpd 317070 May 24 07:59 CHANGES
-rw-r--r-- 1 vsftpd vsftpd 484445 May 24 07:59 CHANGES.ru
drwxr-xr-x 2 vsftpd vsftpd    168 Jun 23 11:05 conf
-rwxr-xr-x 1 vsftpd vsftpd   2590 May 24 07:59 configure
drwxr-xr-x 4 vsftpd vsftpd     72 Jun 23 11:05 contrib
drwxr-xr-x 2 vsftpd vsftpd     40 Jun 23 11:05 html
-rw-r--r-- 1 vsftpd vsftpd   1397 May 24 07:59 LICENSE
drwxr-xr-x 2 vsftpd vsftpd     21 Jun 23 11:05 man
-rw-r--r-- 1 vsftpd vsftpd     49 May 24 07:59 README
drwxr-xr-x 9 vsftpd vsftpd     91 Jun 23 11:05 src
2
3
4
5
6
7
8
9
10
11
12
13
14
查看当前configure脚本中都支持哪些参数,执行如下命令,可以看到编译安装nginx时我们可以使用的配置选项
# ./configure --help
执行”./configure –help”命令后,你可以看到很多选项信息,此处就不列出这些信息了,最常用的莫过于–prefix选项了,使用–prefix选项可以指定nginx编译安装的目录,除了一些常见的目录设置选项,你应该还会看到好多类似”–with-XXX_module “或” –without-XXX_module”的选项,这些选项是什么意思呢?说到这些选项,又要提到我们刚才介绍的概念了,那就是”模块”的概念,我们已经知道,nginx是高度模块化的,每个模块就代表一个功能,而且刚才也提到过,只有编译安装的方式才能指定安装哪些模块,不安装哪些模块,其实,你可以这样理解,”–with-XXX_module “选项表示指明安装对应的模块,” –without-XXX_module”选项表示指明不安装对应的模块。
换句话说就是:
如果你没有明确使用”–with-AXX_module “选项,那么默认情况下是不会安装”AXX模块”的。
如果你没有明确使用” –without-BXX_module”选项,那么默认情况下是会安装”BXX模块”的。
使用”–with-XXX_module “选项添加默认未加入的模块,使用” –without-XXX_module”选项排除默认会加入的模块。
# 3.编译安装
# ./configure --prefix=/data/nginx \
--with-file-aio \
--with-http_auth_request_module \
--with-http_ssl_module \
--with-http_v2_module \
--with-http_realip_module \
--with-http_addition_module \
--with-http_xslt_module=dynamic \
--with-http_geoip_module=dynamic \
--with-http_sub_module \
--with-http_dav_module \
--with-http_flv_module \
--with-http_mp4_module \
--with-http_gunzip_module \
--with-http_gzip_static_module \
--with-http_random_index_module \
--with-http_secure_link_module \
--with-http_degradation_module \
--with-http_slice_module \
--with-http_stub_status_module \
--with-http_perl_module=dynamic \
--with-pcre \
--with-pcre-jit \
--with-stream=dynamic \
--with-stream_ssl_module
2
3
4
5
6
7
8
9
10
11
12
13
14
15
16
17
18
19
20
21
22
23
24
25
编译完成显示
Configuration summary
  + using system PCRE library
  + using system OpenSSL library
  + using system zlib library

  nginx path prefix: "/data/nginx"
  nginx binary file: "/data/nginx/sbin/nginx"
  nginx modules path: "/data/nginx/modules"
  nginx configuration prefix: "/data/nginx/conf"
  nginx configuration file: "/data/nginx/conf/nginx.conf"
  nginx pid file: "/data/nginx/logs/nginx.pid"
  nginx error log file: "/data/nginx/logs/error.log"
  nginx http access log file: "/data/nginx/logs/access.log"
  nginx http client request body temporary files: "client_body_temp"
  nginx http proxy temporary files: "proxy_temp"
  nginx http fastcgi temporary files: "fastcgi_temp"
  nginx http uwsgi temporary files: "uwsgi_temp"
  nginx http scgi temporary files: "scgi_temp"
2
3
4
5
6
7
8
9
10
11
12
13
14
15
16
17
18
上述命令执行完成后,没有错误即可进行编译,执行make命令
# make
完成上述步骤后你可能会发现,解压目录中多了一个objs目录,这个目录是编译安装nginx时产生的中间文件,第一次安装时不用太在意它,如果你以后想要升级老版本的nginx,则会使用到这个目录,此处不用在意,执行如下安装命令
# make install
检查是否安装成功
# /data/nginx/sbin/nginx -V
nginx version: nginx/1.22.0
built by gcc 4.8.5 20150623 (Red Hat 4.8.5-36) (GCC)
built with OpenSSL 1.0.2k-fips  26 Jan 2017
TLS SNI support enabled
configure arguments: --prefix=/data/nginx --with-file-aio --with-http_auth_request_module --with-http_ssl_module --with-http_v2_module --with-http_realip_module --with-http_addition_module --with-http_xslt_module=dynamic --with-http_geoip_module=dynamic --with-http_sub_module --with-http_dav_module --with-http_flv_module --with-http_mp4_module --with-http_gunzip_module --with-http_gzip_static_module --with-http_random_index_module --with-http_secure_link_module --with-http_degradation_module --with-http_slice_module --with-http_stub_status_module --with-http_perl_module=dynamic --with-pcre --with-pcre-jit --with-stream=dynamic --with-stream_ssl_module

# /data/nginx/sbin/nginx 启动nginx
2
3
4
5
6
7
8
通过浏览器访问IP,如图

nginx默认配置启动成功后,会有两个进程,一个主进程(守护进程),一个工作进程。主进程负责管理工作进程,工作进程负责处理用户的http请求。
# ps -ef | grep nginx
root     27395     1  0 11:18 ?        00:00:00 nginx: master process /data/nginx/sbin/nginx
nobody   27396 27395  0 11:18 ?        00:00:00 nginx: worker process
2
3
# 3.配置nginx开机启动(非必须)
有两种方式,一种是在文件中添加 ‘/data/nginx/sbin/nginx’,另一种是通过supervisor管理nginx进程。
echo '/data/nginx/sbin/nginx' >> /etc/rc.d/rc.local

ll /etc/rc.d/rc.local
-rw-r--r-- 1 root root 554 Aug 31  2019 /etc/rc.d/rc.local
添加可执行权限:
chmod +x /etc/rc.d/rc.local
2
3
4
5
6
通过supervisor管理nginx进程,实现开机自动启动,且进程挂掉后自动重启,本篇文字不细讲了,感兴趣可以自己搜索。
# 4.nginx设置环境变量(非必须)
# nginx -t
-bash: nginx: command not found

# vim /etc/profile
添加:
export PATH="$PATH:/data/nginx/sbin"
保存退出。

#使配置立即生效
source  /etc/profile
2
3
4
5
6
7
8
9
10
测试是否生效
# nginx -t
nginx: the configuration file /data/nginx/conf/nginx.conf syntax is ok
nginx: configuration file /data/nginx/conf/nginx.conf test is successful
2
3
端口管理
# netstat -tunpl |grep nginx
tcp        0      0 0.0.0.0:80              0.0.0.0:*               LISTEN      27720/nginx: master
2
# curl http://127.0.0.1
<!DOCTYPE html>
<html>
<head>
<title>Welcome to nginx!</title>
<style>
html { color-scheme: light dark; }
body { width: 35em; margin: 0 auto;
font-family: Tahoma, Verdana, Arial, sans-serif; }
</style>
</head>
<body>
<h1>Welcome to nginx!</h1>
<p>If you see this page, the nginx web server is successfully installed and
working. Further configuration is required.</p>

<p>For online documentation and support please refer to
<a href="http://nginx.org/">nginx.org</a>.<br/>
Commercial support is available at
<a href="http://nginx.com/">nginx.com</a>.</p>

<p><em>Thank you for using nginx.</em></p>
</body>
</html>
2
3
4
5
6
7
8
9
10
11
12
13
14
15
16
17
18
19
20
21
22
23
24
即可成功编译安装nginx,下一篇文章再介绍nginx的基本命令和操作。